My ubuntu 12.04 root partition almost run out of free space and it need to be extended so I still can do my jobs and others stuffs like downloading, backup, etc. This is my steps to do that completed with some images (The images are not well aligned and displayed some backlight because I used my android camera to capture the screen while GParted taking actions). My laptop is a dual boot OS (Ubuntu 12.04 and Windows 7). See my grub. 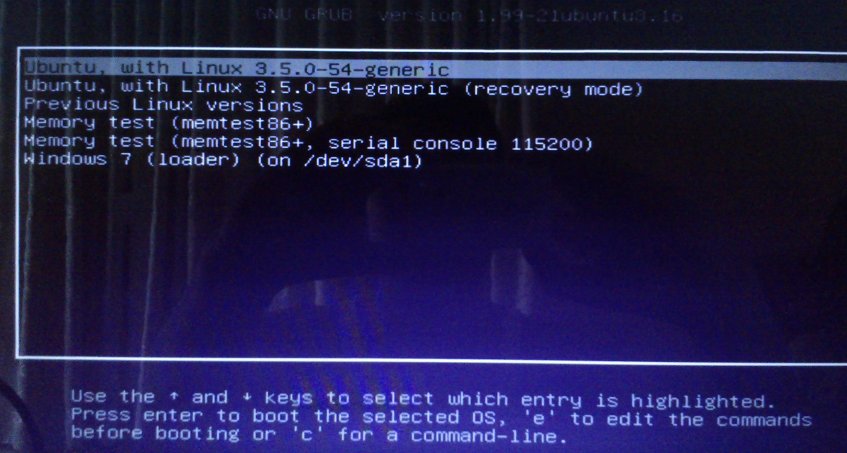 I have four partitions. Two for Windows 7 (Drive C and D) and the rest for Ubuntu (Root and Swap). Here is the screen of the partitions.
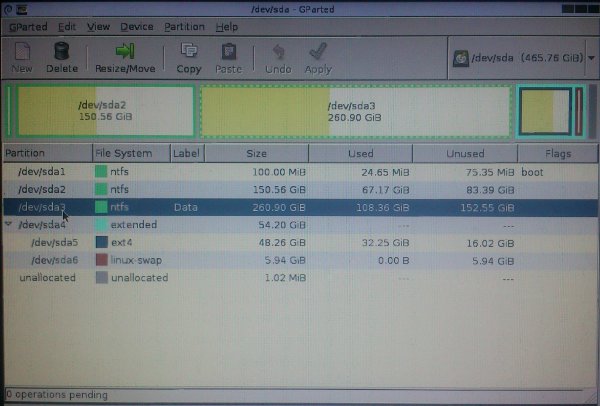 The ubuntu root partition (/dev/sda5 with ext4 format) has less than 30% of free space (16.02 GB of 48.26 GB) and I wanted to increase the size by adding more 50GB . We need a software to shrink one of windows partition (/dev/sda2 and /dev/sda3, both has ntfs format) and take the space to the ubuntu partition. I wanted to use GParted Live CD to do those. At time of writing, I used the 0.19.1-1 amd64 version (gparted-live-0.19.1-1-amd64.iso) because my laptop has 6GB RAM. It very risky to shrink the windows partition (/dev/sda2) that has operating system (C drive). So I pick the another partition (/dev/sda3) that has a label ‘Data’. Its a D Drive for windows.
Before doing resize (extend or shrink) partition, make sure to check the disk health and backup the important data before. Its also better and safer to defrag the windows partition so we’ll not lose our data because of resizing (although GParted Live CD has capability to move data at the end of partition to the free space before resizing). Before resizing, I used Auslogics Disk Defrag to defrag the partition. The software move the fragmented files to the end of the disk (the slower part). We’ll shrink the partition and we dont want to lose any file because of this. Like I said, GParted can move the files at the end of the disk to the free space so our data will be safe. Now It is our time to resize the partitions.
Restart the laptop and put the GParted CD in the CD/DVD Drive. Dont forget to boot from the CD. At the beginnning, you’ll find the options of GParted setting. Just use the default, GParted Live (Default settings). Then just press Enter key on the others setting, like the language choice and The graphical choice. Now. we get in to the main GParted form like the image above. In our scenario, we’ll shrink the windows partition (/dev/sda3 with ‘Data’ labelled) first.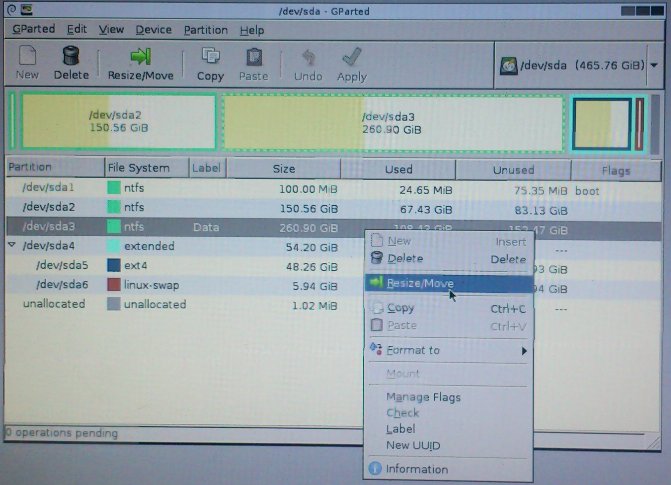 To shrink the partition, we can drag the partition at the end to left or just type the value of space that we need. For example, we need to shrink the partition for 50 GB (50000 MB).
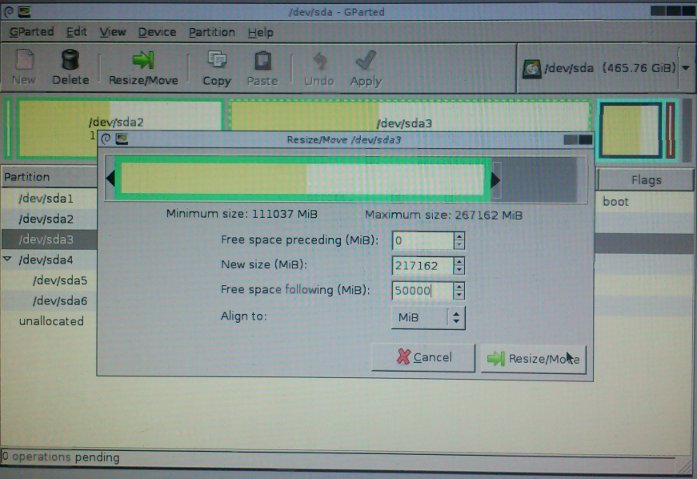 Just click the ‘Resize/Move’ button. The new unallocated partition (the grey box) will be created. Here is preview.
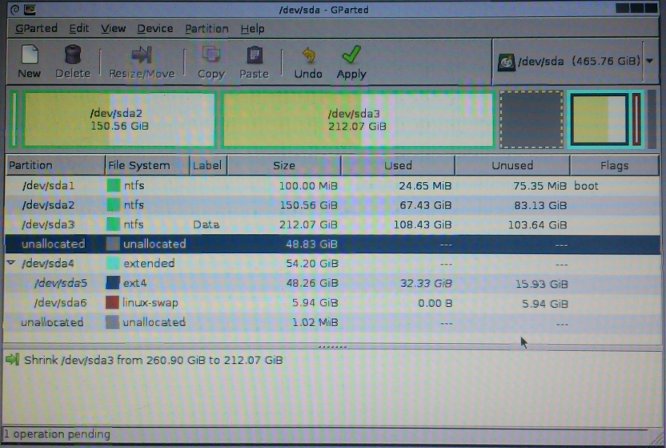 Just click the Tick mark (‘Apply’) to run the resizing process. If there is a box ‘Are you sure you want to apply the pending operations’, Click the ‘Apply’ button. Here is the process.
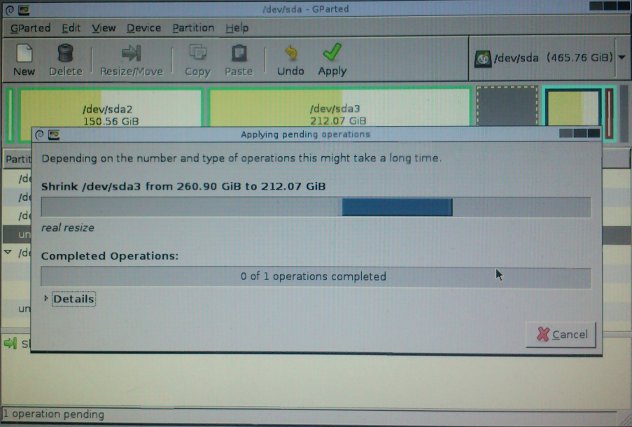 The process will take some time depend on the disk size and the content size. GParted will move any data at the end of the partition to the free space. If the operation completed successfully, here is the result.
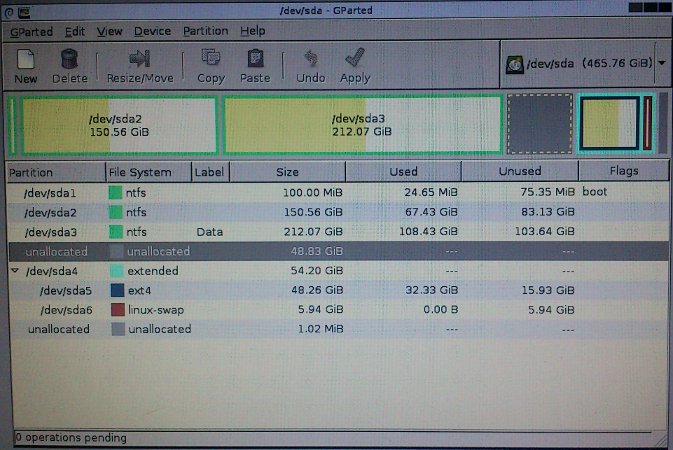 The next step is to move the unallocated partition to the ubuntu extended partition (/dev/sda4) to merge it with the root partition (/dev/sda5). To do the first, we need to resize the extended partition (/dev/sda4) by occupying the unallocated one. We can’t resize/move the unallocated partition directly. But we can resize/move the other partition through the unallocated one. Here we go.
 We found the unallocated partition (the greybox) before the extended one (the yellow box with cyan border).
  We’ll occupy the unallocated partition by dragging the left arrow of the extended on to left. So the unallocated one will be moved in to the extended one (see the cyan border).
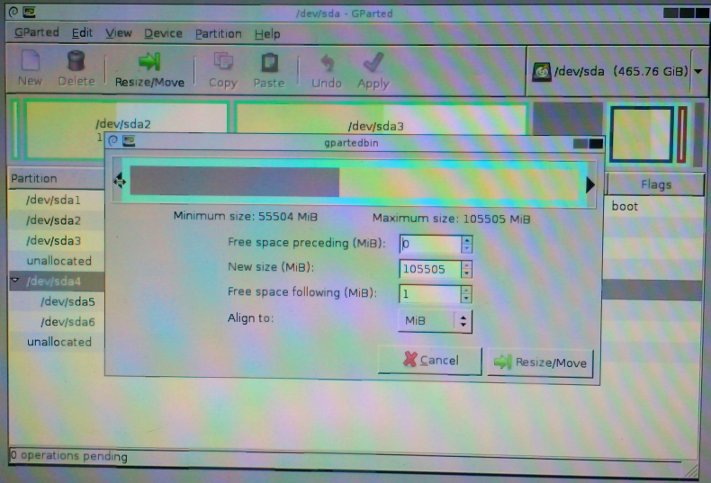 Click the ‘Resize/Move’ button to list our job to the pending operation. Here is the preview. See the unallocated partition is in the extended one right now.
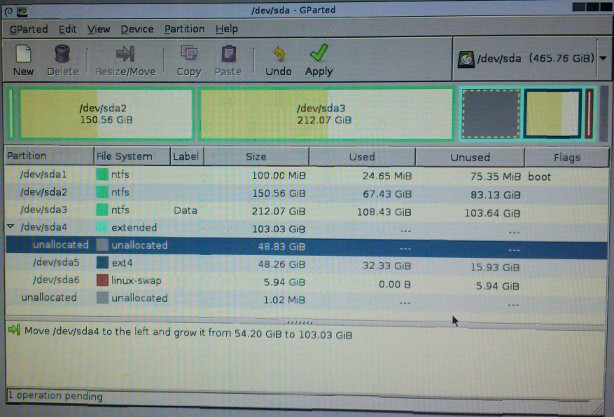 Now, we’ll merge the unallocated partition with the root one (/dev/sda5). Like before, we cant resize/move the unallocated partition. So we’ll resize the root one.
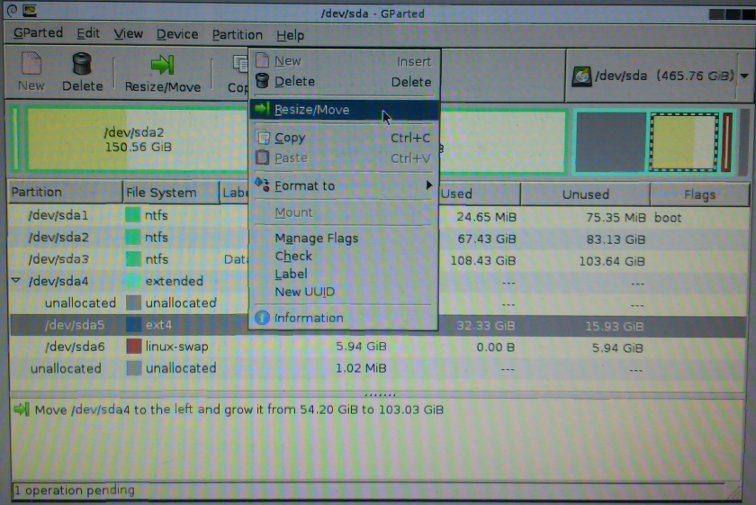 Here is the form. See the unallocated (the grey box) at the left and the root (the blue border) at the right.
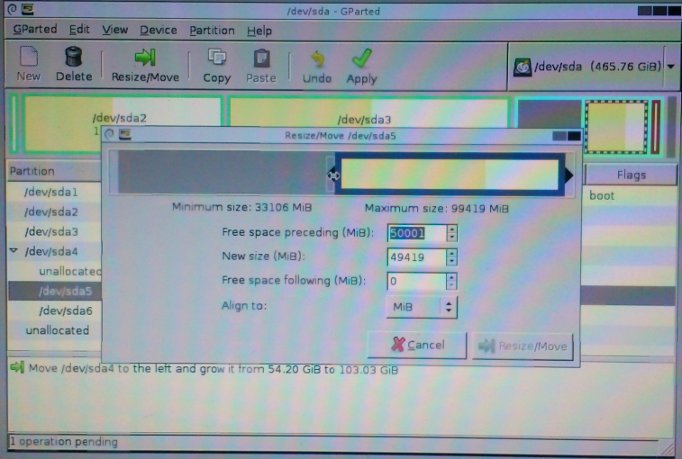 Drag the left arrow of the root partition to left until the most left so it’ll occupy all the unallocated partition.
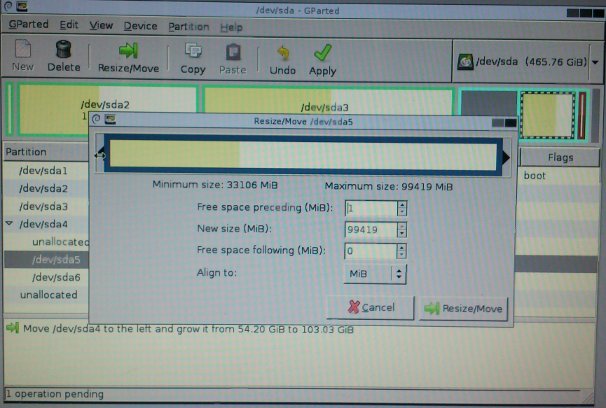 Although I dragged the left arrow to the most left, I can’t change the ‘Free space preceeding’ value to 0 so I leave it to minimum value, 1 MB. Now, just click the ‘Resize/Move’ button. GParted know we are resizing the partition that contain an operating system so a warning form will be appeared.
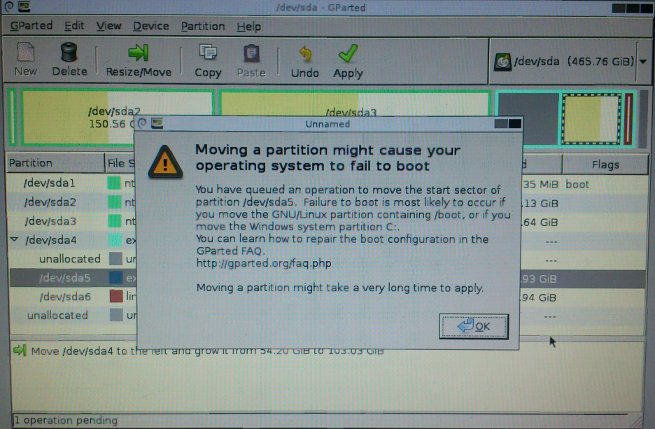 Ignore the warning and click the ‘OK’ button. The root partition will be extended and the unallocated gone because it merged to the root one (ignore the tiny unallocated partition at the end of the partition list). Here is the preview.
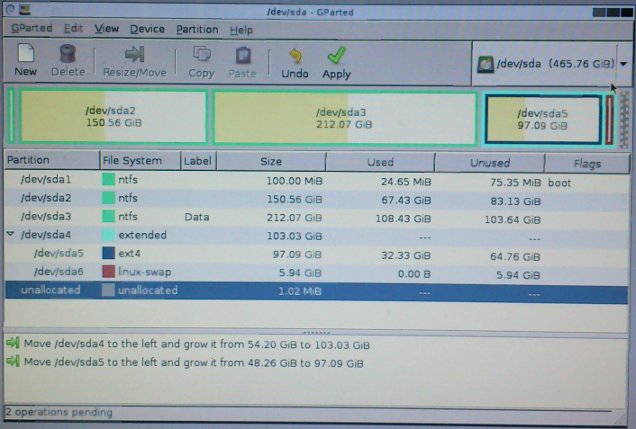 Now, its time to process the pending jobs. Just click the tick mark (‘Apply’ button). Please be patient until all process are completed.
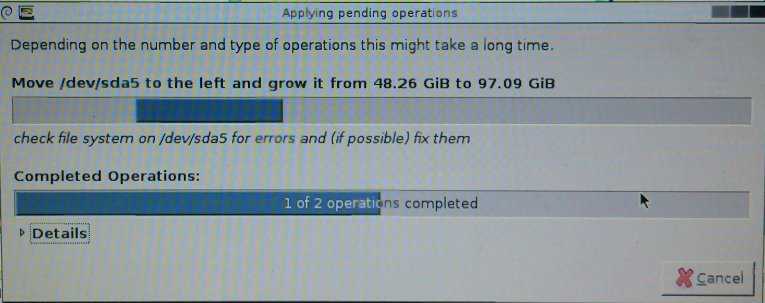
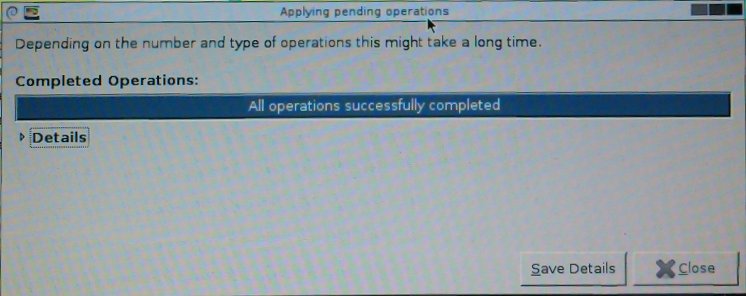 Here is the final result.
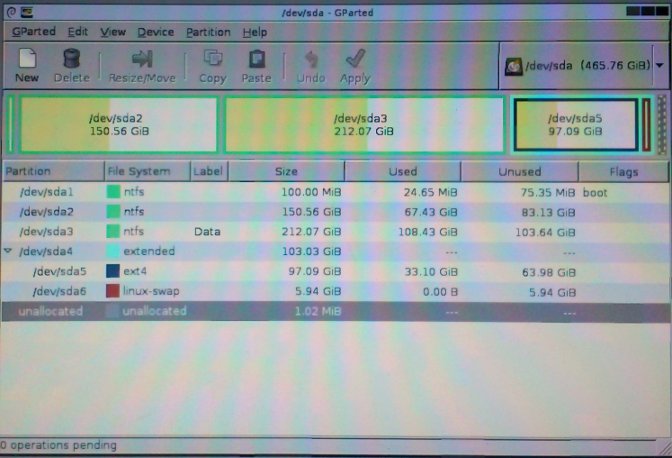 Okay, the root partition now is increased 50 GB so the current size is 100 GB (97,09 GB precisely).
Because we resized the windows and ubuntu partition, we need to check the both for any error. We check the windows partition first. We have to restart our PC/laptop and dont forget to remove the GParted CD. At the restart, Windows recognized the partition changed and prompt a suggestion to check the disk (CHKDSK command). Just left the process run until completed, dont press any key. 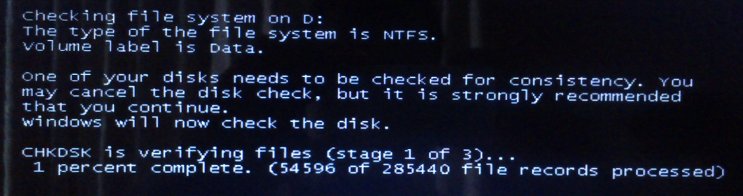 if there is no error displayed, its very good. We also need to check our files in the D drive by opening Windows Explorer.
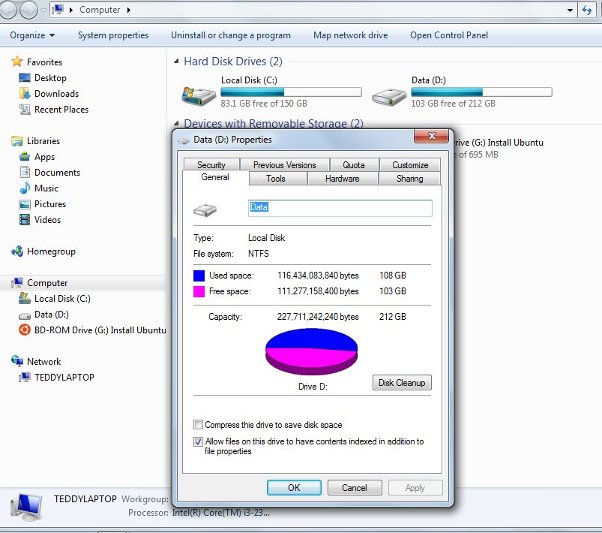 We also can use a good defragment software like Auslogics to analyze our data in the partition. Like I said before, There are some fragmented data at the end of the partition (the red box) before the resizing and correctly GParted moved the fragmented data to the free space so we dont lose our data.
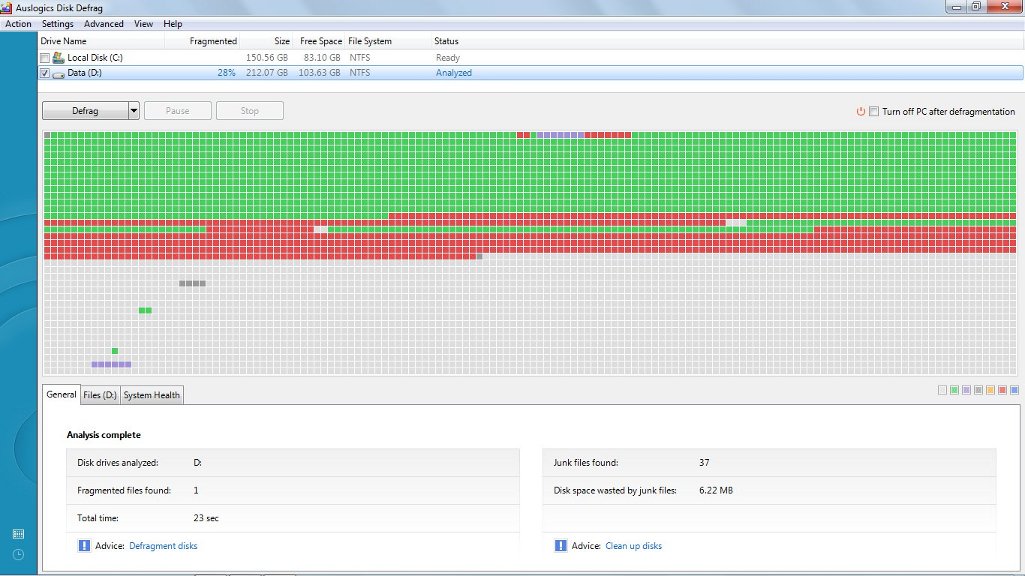 Now its the time to check the ubuntu partition. Restart the PC/laptop again and choose the ubuntu to boot. You can use the System Monitor application to view the available disk space (at the System tab).
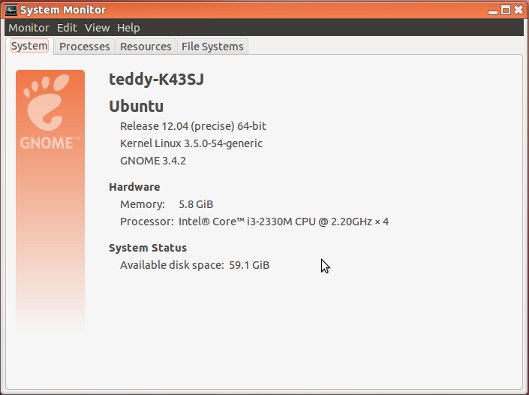 We also can check the windows partition from ubuntu by opening nautilus.
 So everything well done.
![]()